
Documentation
Getting Started
Step 1 - Accounts Setup
Add bank accounts. You will not actually connect your real bank accounts. You will only create representations of those accounts.
Name your accounts so they are easy to identify. This will be used to track which account the money is coming out of (Example: Checking, Savings, Bob's Account, and etc.).
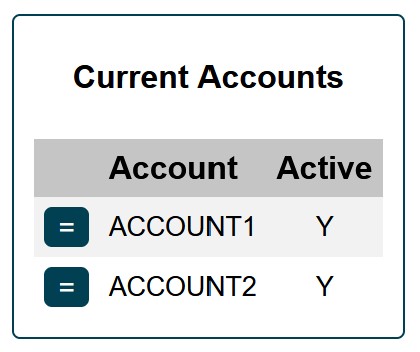
For demonstration purposes, let's assume we have 2 bank accounts. We will name them ACCOUNT1 and ACCOUNT2.
Step 2 - Categories Setup
Create categories.
Categories is how and where we allocate all of our money. Every dollar needs to be assigned to a category. This way all of our money is divided into different categories and every dollar has specific purpose.
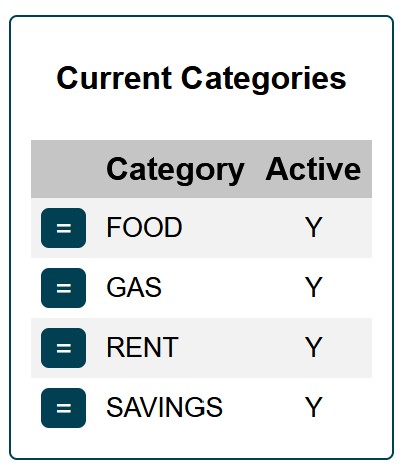
In our example, we will create 4 categories: FOOD, GAS, RENT, SAVINGS.
Step 3 - Budget Setup
Create budget items.
In this step we will create our budget items. Initially, do the best you can here. If you have never created a budget before, this will take some time. Once you start tracking your expenses, it will become more clear how much you need to budget for each of the budget items. Do not worry if the amounts constantly change in the first few months. This is completely normal and expected! Even after everything is dialed-in, your budget will change from time to time. Some expenses will appear or go away and others will increase or decrease.
Think about your monthly expenses and create a budget item for each expense.
Set an amount for each budget item that you anticipate will be needed each month and enter the Start Date. Start Date can be set to the 1st of the current month. Leave End Date blank.
In our example, we will create a simple budge with only 3 items: FOOD, GAS, and RENT.
Important thing that also needs to be done is we have to create an identically named category (see Step 2 above) for each budget item.
In our example, we have 3 budget items and so we will also need 3 identical categories. We have already created them in step 2 when we setup categories. When you create your own personal budget, make sure each budget item has a respective category.

Step 4 - Funding Accounts
In this step we will add funds to our accounts which we created in Step 1. These amounts should match balances in your actual bank account(s). This will be done only once during initial setup.
To add funds to our accounts, we will create our first transaction.
In Amount field, enter the current balance of your actual bank account. In our example, we will assume our bank accounts each have a balance of $1,000.
In Description, enter "Initial Setup".
In Date field, enter today's date.
For Type, select MISC INCOME.
For Account, select the account being funded.
For Category, select TEMP.
TEMP is one of the built-in categories and it is used to temporarily hold funds. Right now it will hold the funds that we moved into our account.
Remember that every dollar which comes in or goes out needs to go into or out of a category. Since we are required to put dollars that come in into a specific category, we will use TEMP category to temporarily hold these initial funds until we reallocate them to other categories.
If you have more than one account, use the button to add another transaction and fund the second account. Repeat this step until all of your accounts are funded.
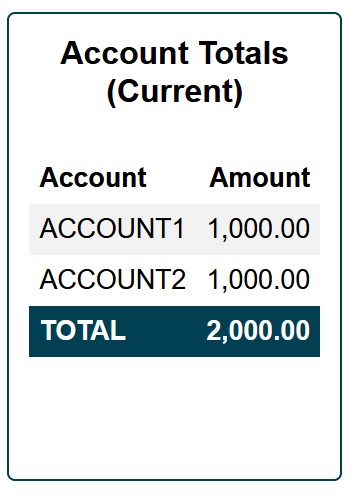
After our accounts are funded, we can see the balance of each account in Overview ().
Step 5 - Category Transfers/Allocations
Now that all of the accounts are funded (Step 4) and all of our funds are being temporarily held in the TEMP category, we need to reallocate all of this money into other categories. TEMP is used to hold funds temporarily and we do not want to leave it there.
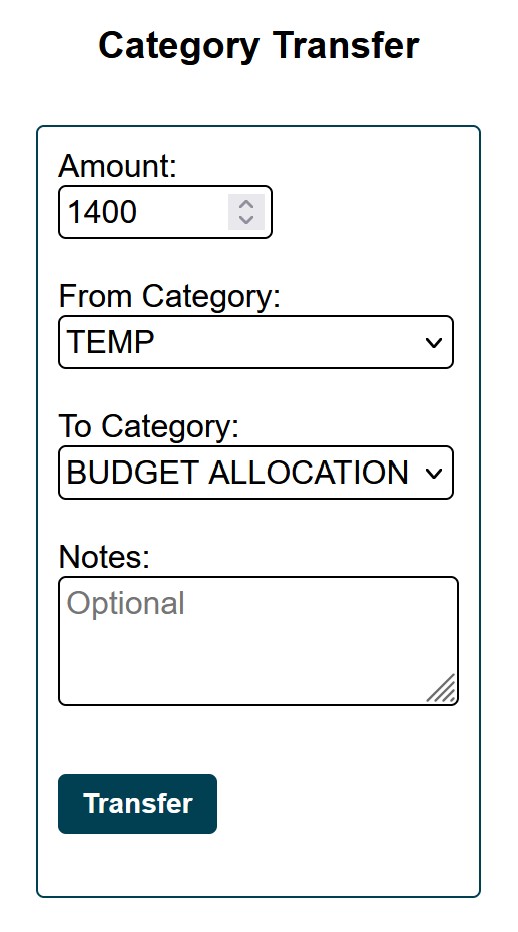
To move funds from one category to another, we will use Category Transfer.
The first category transfer we are going to make is from TEMP category to BUDGET ALLOCATION category.
BUDGET ALLOCATION is another built-in category and it is used to hold funds which will be reallocated into out monthly budget categories (FOOD, GAS, RENT). We will come back to this shortly. First, let's take care of category transfers.
Continuing with our example, in Amount field we will enter $1400, which will go towards our monthly budget.
From Category will be TEMP. This is a category from which the funds are coming out.
To Category will be BUDGET ALLOCATION. This is a category to which the funds are going.
In Overview () we can now see that TEMP category has decreased by $1400 and BUDGET ALLOCATION is now $1400.
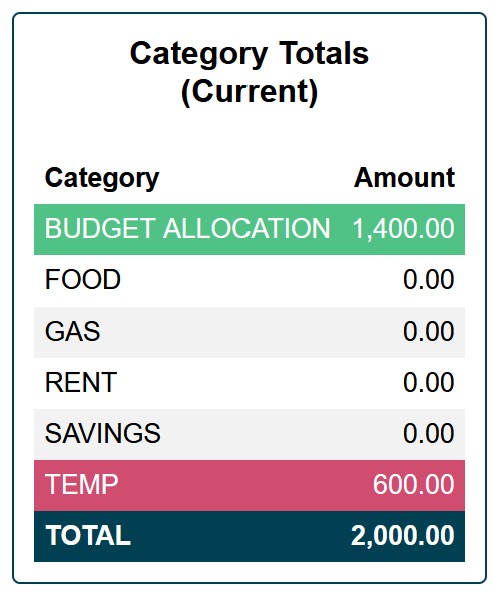
We still have $600 left in the TEMP category. Since TEMP category is used to temporarily hold funds, we need to move these $600 to another category. In our example, we will move it to SAVINGS category.
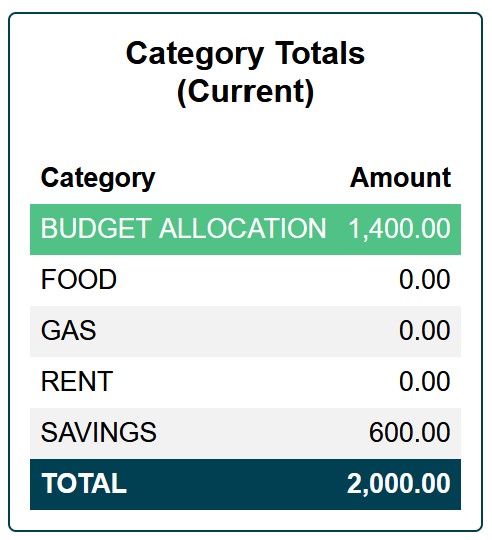
Once again, use Category Transfer to do this ().
After the transfer is made, we can see that TEMP category is gone and we have $600 in SAVINGS category. (Because TEMP is a built-in system category, it will only show up when it does not equal to 0).
Step 6 - Budget Allocation
Next, we will allocate funds for our budget items which we created in Step 3.
To do this, we will use Budget Allocation.
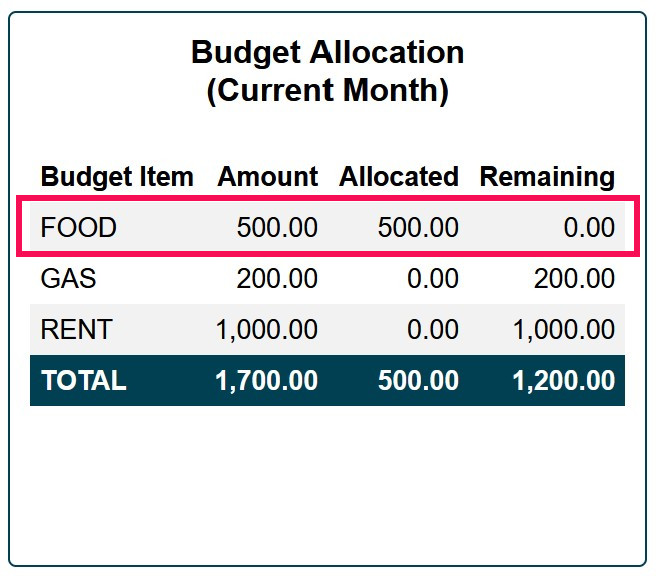
Budget Allocation keeps track of our monthly budget allocations and has 4 columns:
Budget Item - Name of the budget item. Each budget item is required to have an identically named category.
Amount - Monthly amount that we expect for a budget item (i.e. the amount that we plan to spend each month).
Allocated - Amount that has been allocated this month for a budget item.
Remaining - Amount remaining to be allocated this month for a budget item (Remaining = Amount - Allocated).
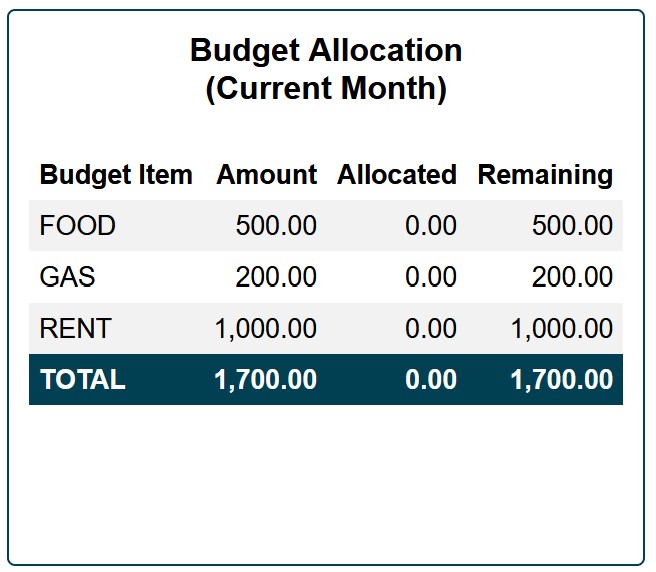
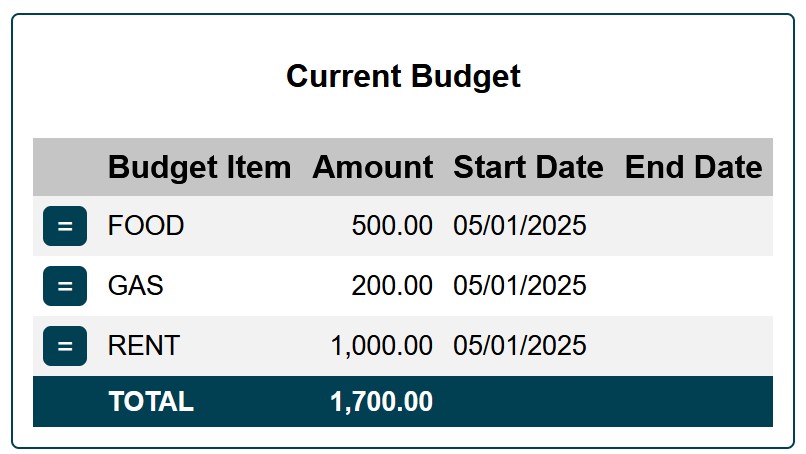
In our example, we have a simple monthly budet with 3 items: FOOD ($500), GAS ($200), and RENT ($1,000) for a total of $1,700.
Note that we also have 3 identically named categories: FOOD, GAS, RENT.
You can view your current Category Totals and Budget Allocation in Overview ().
When we use Budget Allocation feature, we are actually doing a category transfer in the background. We are moving funds from the BUDGET ALLOCATION category into other categories associated with our Budget Items (i.e. FOOD, GAS, RENT).
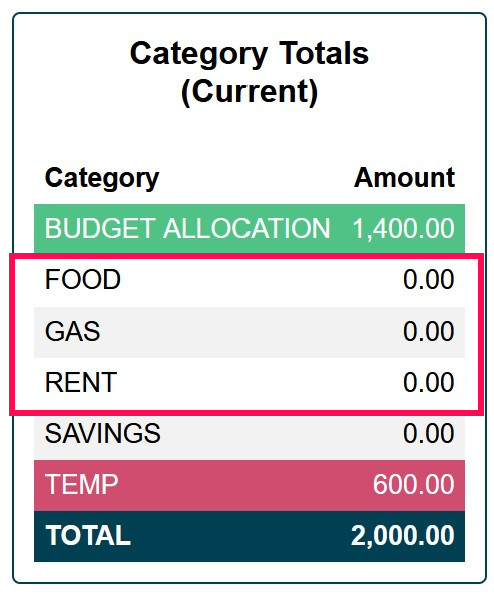
First, in our example, we will allocate funds for FOOD. To do this, we need to be in Budget Allocation.
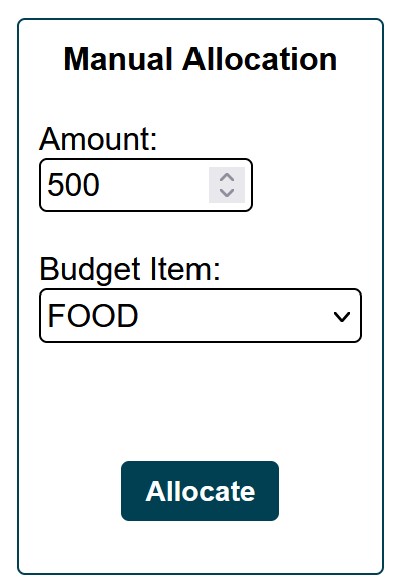
Under Manual Allocation enter the amount, select budget item and hit button.
In our example, we will enter 500 and select "FOOD" from the dropdown menu.
If we look at the Budget Allocation, we will see that we have allocated $500 for food and have $0 remaining.
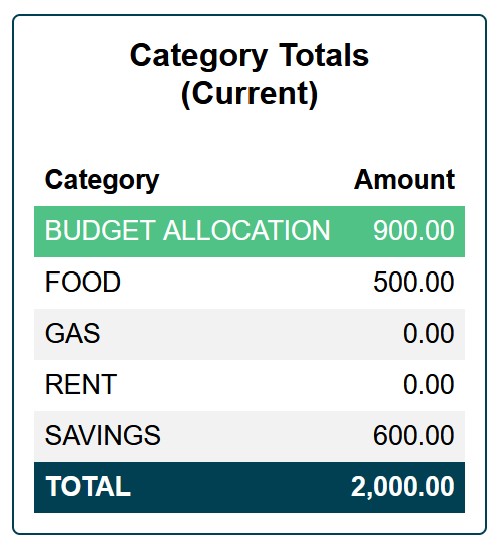
In Category Totals, we can now see that we have $500 available in the FOOD category and BUDGET ALLOCATION category has decreased by $500. Essentially what we have done here is moved $500 from the BUDGET ALLOCATION category to the FOOD category. The only difference is we did it via Budget Allocation, which has also captured how much we have allocated this month towards FOOD in our budget.
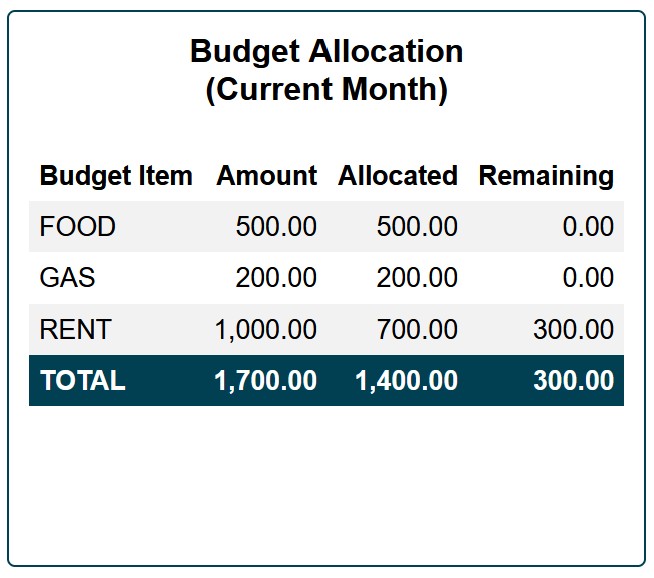
Next, in our example, we will go ahead and allocate the remaining budget items. For GAS, we will allocate full $200. But for RENT, we will allocate $700.
If we look at our Budget Allocation now, we will see that FOOD and GAS is fully allocated. But for RENT we still need to allocate $300 for this month.
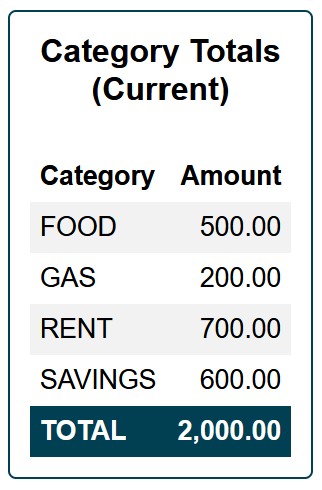
Category Totals will also show $200 in GAS category and $700 in RENT category. You may have noticed that BUDGET ALLOCATION category has disappeared. Since it is also a built-in system category similar to TEMP, it will only show up when it is not equal to 0.
An important thing to remember about allocating funds for your budget items is you have to move funds into the BUDGET ALLOCATION category first. Then you allocate funds towards your budget items via budget allocation feature ().
While technically you can just use Category Transfer and move funds directly into categories associated with your monthly budget, the problem with this approach is that these transfers will not be captured in Budget Allocation and you will not be able to track how much has been allocated towards each of the budget items.
Step 7 - Start Tracking!
Now you are ready to start tracking your expenses and income!
Remember that every dollar you receive or spend needs to go into or out of a specific category. Every dollar has a purpose, and you give it purpose by allocating it to a specific category. When you spend it, it does not just come out of your bank account. It also needs to come out of a specific category.
When you buy gas for your car, that expense will come out of the GAS category. When you buy food, that expense will come out of the FOOD category, and so forth and so on!
With the initial setup behind us, the next step is start tracking your transactions. When you spend or receive money, make sure to enter each transaction in New Transactions ().
Don't worry if this seems confusing and daunting! Once you start tracking your money, it will start to make sense and will become a lot easier. The good news is that in practice, on average, you will only spend a few minutes a day to keep track of your transactions!
Just remember to enter all transactions as soon as possible. It's a lot easier to enter them right away then to remember where the money went several days later!
Step 1 - Accounts Setup
Add bank accounts. You will not actually connect your real bank accounts. You will only create representations of those accounts.
Name your accounts so they are easy to identify. This will be used to track which account the money is coming out of (Example: Checking, Savings, Bob's Account, and etc.).
For demonstration purposes, let's assume we have 2 bank accounts. We will name them ACCOUNT1 and ACCOUNT2.
Step 2 - Categories Setup
Create categories.
Categories is how and where we allocate all of our money. Every dollar needs to be assigned to a category. This way all of our money is divided into different categories and every dollar has specific purpose.
In our example, we will create 4 categories: FOOD, GAS, RENT, SAVINGS.
Step 3 - Budget Setup
Create budget items.
In this step we will create our budget items. Initially, do the best you can here. If you have never created a budget before, this will take some time. Once you start tracking your expenses, it will become more clear how much you need to budget for each of the budget items. Do not worry if the amounts constantly change in the first few months. This is completely normal and expected! Even after everything is dialed-in, your budget will change from time to time. Some expenses will appear or go away and others will increase or decrease.
Think about your monthly expenses and create a budget item for each expense.
Set an amount for each budget item that you anticipate will be needed each month and enter the Start Date. Start Date can be set to the 1st of the current month. Leave End Date blank.
In our example, we will create a simple budge with only 3 items: FOOD, GAS, and RENT.
Important thing that also needs to be done is we have to create an identically named category (see Step 2 above) for each budget item. In our example, we have 3 budget items and so we will also need 3 identical categories. We have already created them in step 2 when we setup categories. When you create your own personal budget, make sure each budget item has a respective category.
Step 4 - Funding Accounts
In this step we will add funds to our accounts which we created in Step 1. These amounts should match balances in your actual bank account(s). This will be done only once during initial setup.
To add funds to our accounts, we will create our first transaction.
In Amount field, enter the current balance of your actual bank account. In our example, we will assume our bank accounts each have a balance of $1,000.
In Description, enter "Initial Setup".
In Date field, enter today's date.
For Type, select MISC INCOME.
For Account, select the account being funded.
For Category, select TEMP.
TEMP is one of the built-in categories and it is used to temporarily hold funds. Right now it will hold the funds that we moved into our account.
Remember that every dollar which comes in or goes out needs to go into or out of a category. Since we are required to put dollars that come in into a specific category, we will use TEMP category to temporarily hold these initial funds until we reallocate them to other categories.
If you have more than one account, use the button to add another transaction and fund the second account. Repeat this step until all of your accounts are funded.
After our accounts are funded, we can see the balance of each account in Overview ().
Step 5 - Category Transfers/Allocations
Now that all of the accounts are funded (Step 4) and all of our funds are being temporarily held in the TEMP category, we need to reallocate all of this money into other categories. TEMP is used to hold funds temporarily and we do not want to leave it there.
To move funds from one category to another, we will use Category Transfer.
The first category transfer we are going to make is from TEMP category to BUDGET ALLOCATION category.
BUDGET ALLOCATION is another built-in category and it is used to hold funds which will be reallocated into out monthly budget categories (FOOD, GAS, RENT). We will come back to this shortly. First, let's take care of category transfers.
Continuing with our example, in Amount field we will enter $1400, which will go towards our monthly budget.
From Category will be TEMP. This is a category from which the funds are coming out.
To Category will be BUDGET ALLOCATION. This is a category to which the funds are going.
In Overview () we can now see that TEMP category has decreased by $1400 and BUDGET ALLOCATION is now $1400.
We still have $600 left in the TEMP category. Since TEMP category is used to temporarily hold funds, we need to move these $600 to another category. In our example, we will move it to SAVINGS category.
Once again, use Category Transfer to do this ().
After the transfer is made, we can see that TEMP category is gone and we have $600 in SAVINGS category. (Because TEMP is a built-in system category, it will only show up when it does not equal to 0).
Step 6 - Budget Allocation
Next, we will allocate funds for our budget items which we created in Step 3.
To do this, we will use Budget Allocation.
Budget Allocation keeps track of our monthly budget allocations and has 4 columns:
Budget Item - Name of the budget item. Each budget item is required to have an identically named category.
Amount - Monthly amount that we expect for a budget item (i.e. the amount that we plan to spend each month).
Allocated - Amount that has been allocated this month for a budget item.
Remaining - Amount remaining to be allocated this month for a budget item (Remaining = Amount - Allocated).
In our example, we have a simple monthly budet with 3 items: FOOD ($500), GAS ($200), and RENT ($1,000) for a total of $1,700.
Note that we also have 3 identically named categories: FOOD, GAS, RENT.
You can view your current Category Totals and Budget Allocation in Overview ().
When we use Budget Allocation feature, we are actually doing a category transfer in the background. We are moving funds from the BUDGET ALLOCATION category into other categories associated with our Budget Items (i.e. FOOD, GAS, RENT).
First, in our example, we will allocate funds for FOOD. To do this, we need to be in Budget Allocation.
Under Manual Allocation enter the amount, select budget item and hit button.
In our example, we will enter 500 and select "FOOD" from the dropdown menu.
If we look at the Budget Allocation, we will see that we have allocated $500 for food and have $0 remaining.
In Category Totals, we can now see that we have $500 available in the FOOD category and BUDGET ALLOCATION category has decreased by $500. Essentially what we have done here is moved $500 from the BUDGET ALLOCATION category to the FOOD category. The only difference is we did it via Budget Allocation, which has also captured how much we have allocated this month towards FOOD in our budget.
Next, in our example, we will go ahead and allocate the remaining budget items. For GAS, we will allocate full $200. But for RENT, we will allocate $700.
If we look at our Budget Allocation now, we will see that FOOD and GAS is fully allocated. But for RENT we still need to allocate $300 for this month.
Category Totals will also show $200 in GAS category and $700 in RENT category. You may have noticed that BUDGET ALLOCATION category has disappeared. Since it is also a built-in system category similar to TEMP, it will only show up when it is not equal to 0.
An important thing to remember about allocating funds for your budget items is you have to move funds into the BUDGET ALLOCATION category first. Then you allocate funds towards your budget items via budget allocation feature ().
While technically you can just use Category Transfer and move funds directly into categories associated with your monthly budget, the problem with this approach is that these transfers will not be captured in Budget Allocation and you will not be able to track how much has been allocated towards each of the budget items.
Step 7 - Start Tracking!
Now you are ready to start tracking your expenses and income!
Remember that every dollar you receive or spend needs to go into or out of a specific category. Every dollar has a purpose, and you give it purpose by allocating it to a specific category. When you spend it, it does not just come out of your bank account. It also needs to come out of a specific category.
When you buy gas for your car, that expense will come out of the GAS category. When you buy food, that expense will come out of the FOOD category, and so forth and so on!
With the initial setup behind us, the next step is start tracking your transactions. When you spend or receive money, make sure to enter each transaction in New Transactions ().
Don't worry if this seems confusing and daunting! Once you start tracking your money, it will start to make sense and will become a lot easier. The good news is that in practice, on average, you will only spend a few minutes a day to keep track of your transactions!
Just remember to enter all transactions as soon as possible. It's a lot easier to enter them right away then to remember where the money went several days later!